2018-03-31

From Gel Print to...#6

On March 29 the theme of the gel printing challenge was 'egg carton'. Birgit showed us how to make beautiful patterns in the paint using an egg carton. 
I thought it would be nice to make a book for that challenge using a small egg carton. A great opportunity to use up some of my gel prints as well.

Op 29 maart was het thema van de gel printing challenge 'eierkarton'. Natuurlijk was het de bedoeling om met de verpakking van eieren textuur aan te brengen in de verf maar ik had nog zo'n klein eierdoosje liggen en bedacht dat het wel leuk zou zijn om er een boekje van te maken gevuld met gel prints.

I glued a gel print on the cover, did some stamping on top.

Op de cover al een eerste print gekleefd waar ik op stempelde.

I folded a bunch of signatures out of the gel prints I've made during the challenge.

Verder een collectie mooie printjes van afgelopen maand bij mekaar gezocht en daar pagina's van gevouwen.

I painted both the inside and outside of the egg carton. 
The book measures approx 9 by 12 cm.

Buitenkant en binnenkant van het eierdoosje geverfd. 
Het doosje meet ongeveer 9 bij 12 cm.

I've cut away the upper ends of the dividers on the inside...

De uitsteeksels aan de binnenkant weggesneden...

...so the pages could lay flat.

...zodat de pagina's mooi vlak kunnen liggen.

I glued those cut offs upside down into the holes. 

Die topjes omgekeerd in de ontstane gaten geplakt.

I've set eyelets into the front and back cover to attach the binding thread and the closure.

Eyelets aangebracht om er de draad voor de binding en de sluiting aan te bevestigen.

I did the binding using a coptic stitch.

Kaften en katernen aan mekaar genaaid met een koptische binding.

Love the colorful spine.

De gel prints zorgen voor een kleurrijke rug.

After doing the binding I closed each signature using double sided tape. This way I hided the unfinished back of the gel prints.

Om de onafgewerkte achterkanten van de prints te verbergen kleefde ik elke katern dicht na het naaien. 

 I clipped the corners of the inside pages so they would fit the covers.

Het eierdoosje heeft afgeronde hoeken dus ook bij alle pagina's de hoeken afgerond.

Stamps
Carabelle Studio by Birgit Koopsen: "Big Things..."

2018-03-30

31daysofgelprinting #8

One of the topics of the gel printing challenge on Instagram is 'silhouette'.

Eén van de uitdagingen van de gel printing challenge op Instagram is 'silhouet'.

I started by cutting this image out of a Flow magazine.

Ik knipte een plaatje uit een Flow magazine en legde dat op de gel printing plate.

I brayered green paint over the image and added texture to the paint. After removing the mask I was ready to pull the print.

Daar verschillende kleuren groene verf over gerold en textuur aangebracht in de verf. Na het wegnemen van het papieren silhouet kon ik gaan printen.

Here I printed on top of an orange gelli print I did before.

Hier geprint bovenop een eerder gemaakte oranje print.

On this one I used Carabelle art printing plates to add texture and I did the print on white paper.

Hier art printing plates van Carabelle gebruikt om textuur aan te brengen in de verf en geprint op een wit blad.

2018-03-26

From Gel Print to...#5

I made this card using one of the gelli prints from THIS blogpost.
Ribbon and vintage image are by Tim Holtz.

Met één van de gelli prints uit DEZE blogpost maakte ik dit vintage kaartje.
Het lint en het plaatje zijn van Tim Holtz.

Stamps
PaperArtsy: Hot Picks HP1503EZ

Tim Holtz Idea-ology: Paper Dolls
BewarenBewaren

2018-03-23

From Gel Print to...#4

Theme of the gel printing challenge today is 'spray inks'.

Vandaag is het onderwerp van de gel printing challenge 'spray inkten'. 

For this topic I created a small art journal, identical to THIS ONE.

Ik maakte weer een soort art journal met ongelijke pagina's, net zoals DIT BOEKJE.

I decorated the cover with the new Dina Wakley tissue paper.

Tissue papier van Dina Wakley op de cover geplakt.

I added stamping, stenciling and doodles...

Verder ook nog stempel- en stencilwerk, doodles...toegevoegd.

The inside pages were colored with Dylusions spray inks.

De pagina's binnenin werden gekleurd met Dylusions spray inkt.

Putting a stencil on the gelli plate, spraying inks and pulling prints.

Een stencil op de gelli plate leggen, sprayen en afdrukken maar. 

The result is always surprising. While making the print on the right page I sprayed too much ink so I lost most of the details of the stencil. To bring back the pattern I sponged some white paint through the stencil.

Altijd een verrassend resultaat. Bij de print op de rechterpagina waren nog slechts weinig details van de stencil zichtbaar. Te veel inkt gebruikt waarschijnlijk. Daarom met witte verf gesponst om het patroon terug te brengen.

Each time I pulled a print while the stencil was still on the gelli plate and one without the stencil. On some pages I made a reverse print only using the inked up stencil.

Elke keer een print gemaakt met de stencil nog op de gelli plate en eentje na het wegnemen van de stencil. Ook een paar keer gewoon de beïnkte/nog natte stencil op het papier afgedrukt.

I did the binding using duct tape and washi tape.
For more info on the binding see THIS BLOGPOST.

Het boekje gebonden met duct tape en washi tape.
HIER vind je meer uitleg over de binding.

The back

De achterkant.

Stamps
PaperArtsy: ETS14, ETS15, EEG15

Stencils
Stencil Gril Products: S290 Bautista, M080 Missigman
Dina Wakley Media: Big Leafy, Halves
TCW: Mini Blazonry, Mini Circle Squares
PaperArtsy: Emma Godfrey PM006
Tim Holtz Layering Stencil: Numeric, Dotted, Splotches, Grid Dot
Darkroom Door: Small Stencil - Circles
Dylusions: Fresh Dots Small 

Dina WakleyMedia: Collage Paper

2018-03-22

From Gel Print to...#3

I finished off one of my A4 gelli prints and glued it in my big Dylusions journal.

Eén van mijn A4 gelli prints afgewerkt en in mijn groot Dylusions journal gekleefd.

I made this print for the 'lines' topic of the gel printing challenge. I applied red, blue and white paint to the plate and made some scribbles into the wet paint with a Dina Wakley tool.

Deze achtergrond maakte ik voor het thema 'lijnen' van de art printing challenge. Ik bracht rode, blauwe en witte verf aan op de gel printing plate en krabbelde erin met een Dina Wakley tool.


I overstamped the print with a tree using black paint. I used an older foam stamp by Donna Downey (A4 size), still one of my favorites.

Op de print een boom gestempeld met zwarte verf. Ik gebruikte een oudere foam stempel van Donna Downey, A4 formaat. Het blijft een favoriet.

Stamps
Prima: Design Donna Downey (tree)
Unity Stamp Co: Create to Breathe

2018-03-21

31daysofgelprinting #7

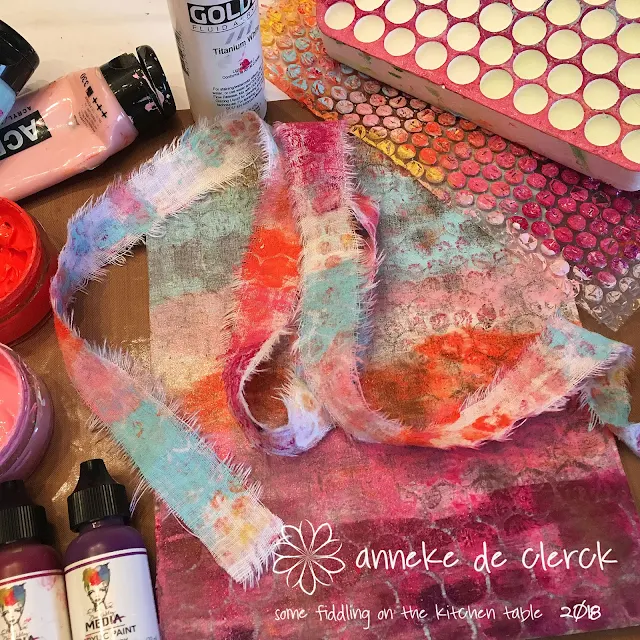
One of the topics of the gel printing challenge is 'fabric'. Printing with fabric or printing on fabric...lots of possibilities. I decided to try printing on fabric.

Eén van de onderwerpen van de gel printing challenge is 'stof'. Drukken met stof of drukken op stof...er is veel mogelijk. Ik koos voor het laatste. 

I've torn off a small strip of linen fabric. 

Een dunne reep linnen stof afgescheurd. 

Work in progress.

Een foto gemaakt tijdens het printen.

Because of the texture of the fabric the gel print is not that crisp but nevertheless I'm happy with the result.

Omwille van de textuur van de stof is de gel print niet zo gedetailleerd maar ik ben toch blij met het resultaat.

It was quite a challenge to take proper pictures :)

Een foto maken van zo'n strook stof is behoorlijk lastig :)

I'm planning to use this strip of fabric as a book closure.

Ik ben van plan om de reep stof te gebruiken als sluiting voor een boekje.

2018-03-19

Darkroom Door Polka Dots Stencil #3

Here are the 2 final cards I made for Darkroom Door using their new Polka Dots stencil.

Hier de twee laatste kaartjes die ik maakte voor Darkroom Door met de nieuwe Polka Dots stencil.

I applied Distress Collage Medium 'Crazing' through the stencil with a palette knife.

Deze keer Distress Collage Medium 'Crazing' aangebracht doorheen de stencil.

After drying I scribbled on the background with Distress Crayons and blended the colors using a wet brush.

Na het drogen op de achtergrondjes gekrabbeld met Distress Crayons. Daar met een vochtig penseel overheen gegaan om de kleuren te mengen.

Coloring the background highlights the crackles. Love how it turned out.

Door de achtergrond te kleuren werden de 'crackles' zichtbaar, tof effect.

Stamps & Stencil Darkroom Door

Distress Crayons: Spiced Marmalade, Carved Pumpkin, Worn Lipstick, Picked Raspberry, Victorian Velvet, Mustard Seed, Twisted Citron, Mermaid Lagoon

2018-03-18

From Gel Print to...#2

This is the second card I made with one of my gelli prints. 

Opnieuw een kaart gemaakt met een gelli print.

For the 'feathers' theme I pressed feather stamps into the paint before pulling the print.

Deze keer was het thema 'veren'. Ik drukte verenstempels af in de verf alvorens de print te maken.

I stamped one of the feathers in black and adhered it to the card using 3D tape. I finished the card off with Tim Holtz trimmings.

Ook nog een veer met zwarte inkt gestempeld, uitgeknipt en met 3D tape op de achtergrond vastgemaakt. Afgewerkt met een rijtje stoffen roosjes van Tim Holtz.

Stamps
Carabelle Studio: Scribbled Feathers by Birgit Koopsen
Darkroom Door: Simple Sayings